Git
Remarks
- commit messages are to be written in present tense
Config
Ensure git is installed
which gitGlobal one-time config
$ git config --global user.name "Your Name"
$ git config --global user.email [email protected]

# run before git pull to store creds
$ git config --global credential.helper store
Configuration settings located in
~/.gitconfig
Initializing a repo
- Create a new directory
- Execute
git initwhile inside the target directory
Commands
git init:: initialize a local git repo inside of existing directorygit config:: configure git settingsgit status:: shows status of repo (untracked files, unstaged edits, etc)git add .:: change untracked file to stagedgit add <name>:: add given file to staging areagit commit -m [msg]:: take changes from staging area and make them part of local repogit commit -a:: commit all changes made to files already tracked by git; this allows you to skipgit addif you’re not adding new files to the repogit commit —amend:: change previous commit messagegit log:: view commit recordgit log -p:: show complete diffs for each commitgit diff:: shows difference between last commit and unstaged changes in current projectgit show <SHA>:: show particular commit details from commit SHAgit push:: push commits up to default remotegit push -u <loc> <br>:: push branch to remotegit remote add:: add remote repo
Four common git states:
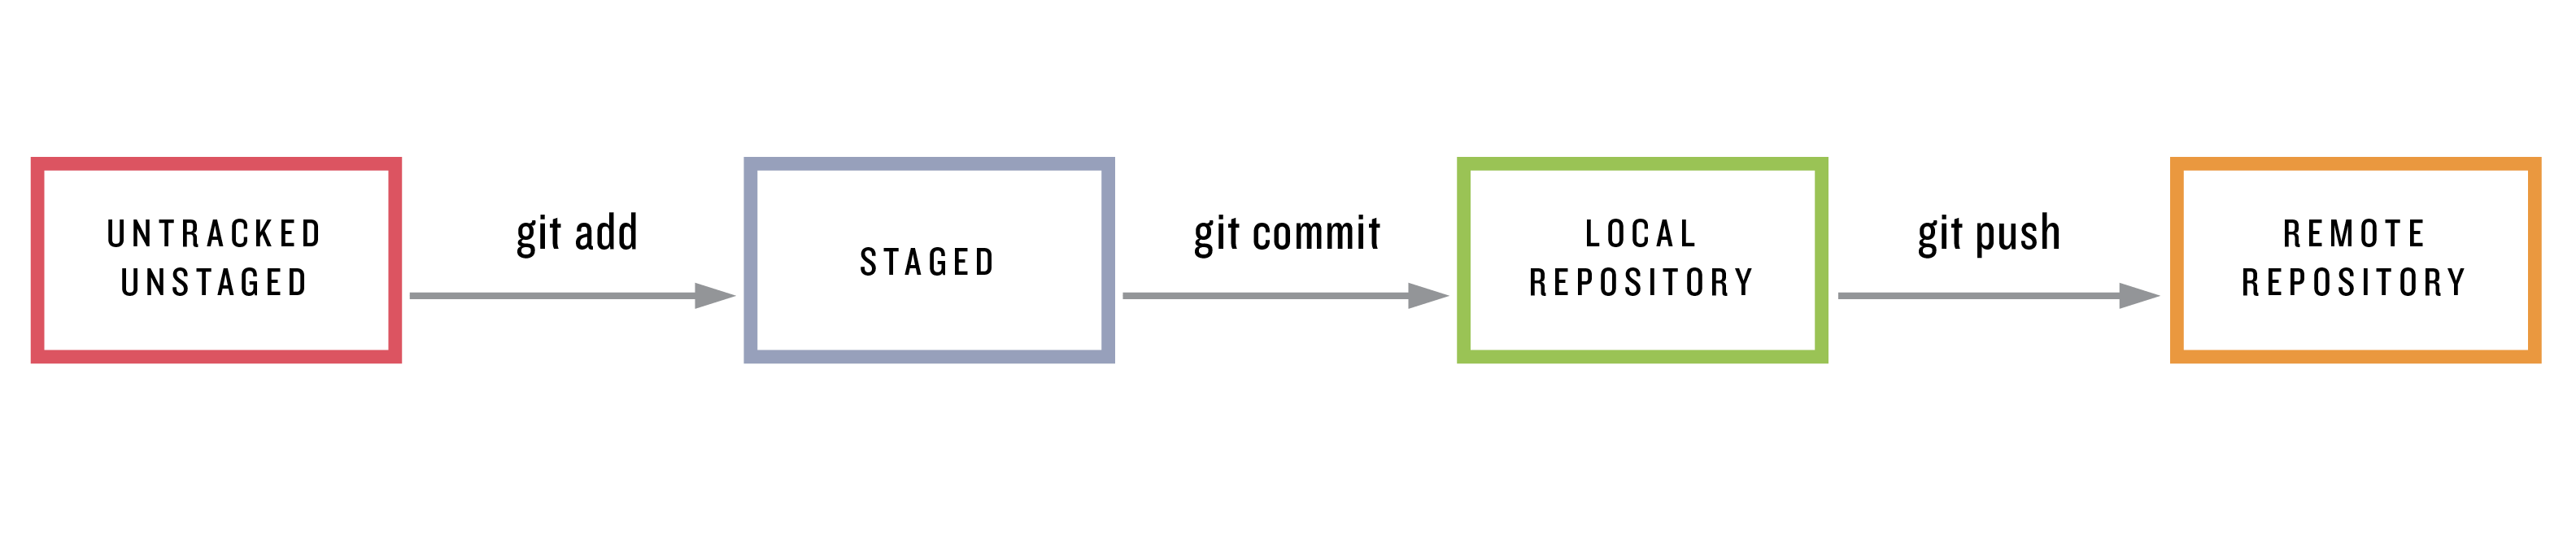
add-commit-push sequence
- Add or change files in a directory. The files added are currently untracked, and any changes are considered unstaged.
- (optional) Check the difference between the current unstaged directory and the previous commit in the git repo with
git diff. Can be a useful preview before adding and committing.
- (optional) Check the difference between the current unstaged directory and the previous commit in the git repo with
- Execute
git add .to ensure all untracked files become tracked and staged, and edits (to tracked files) are added to the staging area. The repo is now ready to be committed. - Execute
git commit -m <msg>to commit the repo, which essentially pulls the changes from the staging area into the local repo- You can use
git commit -am <msg>to skip thegit addstep and immediately commit any changes to files already tracked (does not add untracked files) - If you realize you’ve made a mistake with your commit message, execute
git commit —amendto modify the previous commit message
- You can use
- Execute
git pushto push the recent commit up to the remote repository
Ignoring files
To ignore tracking certain files when adding files to a git repo, we can create a .gitignore file. Simply list the file (i.e. file.txt) or directory (i.e. dir/) names that you don’t want git to track and they won’t be added when running git add .. Wildcards can be used to match patterns in file names you want to ignore.
For existing repo
A common annoyance is finding some committed files that you wish had been included in a .gitignore. To remove some already committed files, we can clear the git cache with git rm --cached <file>. Include the -r option is recursing over a directory. Then create a commit to remove the files, and you’re set to add a .gitgnore.
Deleting local changes
Remove all local changes, reset to tracked files: git reset --hard
Contributing to a repo
- Fork the target repo to personal account
- Clone the fork to local machine (personal fork is origin)
- Add original repo as a remote called upstream
- Pull upstream changes to local repo
- Create a new branch (if needed)
- Add code, maintaining repo code styles and performing necessary tests
- Rebase commits
- Push local new branch to personal fork
- Open pull request in correct branch of original repo
- Once request is approved/merged, pull changes to local repo and delete extra branches
Github repositories
Pushing an existing local directory to Github
Execute
git initin the existing directory, add files and create an initial commitCreate a GitHub repo, copy the commands given for adding an existing directory. These will look like
(master) $ git remote add origin https://github.com/<username>/<repo>.git
(master) $ git push -u origin master
The first sets the remote origin as the Github repo, and the second pushes the code up to this repo (
Cloning a Github repo
- Copy link URL from Github repo
- Execute
git clone <URL> <repo-name>in local directory where you’d like to create the git repo
Branches
Branches are essentially self-contained copies of the source repo that can be modified in isolation from the master branch. They are generally helpful when collaboration is required for a repo and a user wants to implement a feature or make potentially unstable edits. After creating and/or checking out a branch, it can be developed the same way master could. Note that when a branch is created, any existing uncomitted changes will be applied to the new branch when committed. All changes are committed and stay within the branch until it is merged back into master. Note that master is the default name for the global repo branch, generally considered to contain the most recent stable build, which is not always the most recent code. The HEAD pointer points to the last commit on the currently checked out branch.
- List branches:
git branch - List all branches (ie including origin):
git branch -a - Checkout a branch:
git checkout <branch> - Create a branch (“copy” of current branch):
git branch <branch name> - Create a branch and checkout:
git checkout -b <branch> - Merge a branch into currently checked out branch:
git merge <branch> - Merge
branch2intobranch1:git merge <branch1> <branch2> - Delete a branch (typically after merge):
git branch -d <branch> - View difference between branches (branch1 defaults to local branch if not specified):
git diff <branch1> <branch2> - Push a branch to remote (sets tracking information so pull works):
git push -u <remote> <branch> - Set branch upstream (if
-unot used when pushing):git branch --set-upstream-to=origin/<branch> branch - Show tracking info:
git branch -vv
Tracking
A local branch can be set up to track a remote branch. That is, there is a link between the two branches that enable pushing and pulling changes with ease.
Recovery
- Checkout to head (latest commit), destroying all uncommitted changes:
git checkout -f - Delete unmerged branch (-d doesn’t work unless branch has been merged):
git branch -D <branch> - Checkout a previous commit (good for previous inspection, can also branch from this commit):
git checkout <commit-SHA>
Collaboration
Conflicts
Often times changes will be made by a person in between another person’s pulls.That is, after person A has pulled a remote repo and made some edits, person might have pushed changes up to the remote repo by the time person A is ready to push. In this case, Git will not allow person A to push their because there are changes remotely that they do not have locally. In order to push, they must first pull the remote changes down into their local repo where Git will merge those remote changes in with those changes that have been made locally. Most of the time Git will be able to handle these merges without issue, as code does not directly conflict.
Pull-Merge-Push sequence
- After having made local changes,
git pushyour changes up to the remote when ready. If there are no issues, then all is clear. However, if the push is rejected, continue with the following steps. - Execute
git pullto pull down and merge any remote changes that have occurred since you last synced up for local repository. Git will attempt to merge any remote changes into your local repo. - If the local and remote changes are non-conflicting, Git will successfully merge the code and your repo, creating a new commit which by default describes the merge that is occurring. The repo will be up to date as well as include your recent changes and ready to push. If the changes were conflicting, Git will alert you of this and modify the source file in the places where merge conflicts occurred. It also places things temporarily in a
<name>|MERGINGbranch. Here you will have to inspect the file and modify it so as to resolve the conflict. After resolving conflicts, create a new commit and your repo will be updated and merge back to the original branch. - Execute
git pushto push your (now synced) repo with local changes up to remote.
Remotes
A remote, or remote repository, are versions of a repo stored on a server somewhere. A local repo can have more than o-ne remote, to and from which it pushes and pulls changes. Note that when cloning a repo, Git by default names the remote under the alias origin and the server repo is considered the upstream repository. So master refers to the local master branch, origin/master refers to the master branch of the remote aliased as origin (which is actually a local copy of the remote state), and origin is the alias for a remote url.
- Add remote repo to local repo:
git remote add origin <URL> - List all remotes:
git remote - Fetch all remote-tracking branches and merge only remote branch matching current local branch:
git pull <remote>git pullis equivalent togit pull origin(unless config has changed default behavior)- The behavior described is the default for when no branch is specified. A fetch is performed on all remote branches that are locally tracked (ie storing a local copy under
origin/<branch>). However the merge is only performed from currently checked out branch’s upstream tracked branch into the currently checked out branch.
- Fetch and merge specified remote branch into currently checked out branch:
git pull <remote> <branch> - Fetch changes (without merging) from remote (defaults to origin) branch (defaults to current branch) into current local branch:
git fetch <remote> <branch>- For example,
git fetch origin mastergrabs the remoteorigin’smasterbranch and stores the code under the local branchorigin/master. You can then merge this branch into the current local branch viagit merge origin/master
- For example,
- Push changes from current branch to tracked remote branch:
git push <remote>git pushis the same asgit push origin(unless config has changed default behavior)- Pushing from only the currently checked out branch to the matching tracked remote branch is the default behavior as specified in
push.default. Note that your local branch must be tracking in order forgit pushto work; other you must specify the remote and branch to push to each time. Also note that even when your local branch is tracking,git push(by default) will not automatically push to the tracked branch if the names of the local and remote branches differ. In this case you can explicitly specify which upstream branch to push to, but the point is that git only automatically pushes to a tracked upstream branch that is also matching. - Can push all branches to their tracked matching remote branches with
git push <remote> —all - The command
git push -u <origin> <branch>(shorthand for—-set-upstream) will push up a (potentially new) branch and set tracking information related to the upstream branch - If tracking is not setup or there is a local-remote branch name mismatch, you can use
git push <remote> <local-branch>:<remote-branch>to merge the local branch into the remote one
- Push changes from specific local branch to remote branch:
git push <remote> <branch>
Merging and rebasing
Fast-forward merge
A fast-forward merge is a particular type of merging procedure. It occurs when attempting to merge two branches whose histories do not conflict (ie after the branch point). For example, suppose branch newbranch was created from master and a series of commits were made to newbranch. When attempting to merge newbranch back into master, if no commits were made to master since the branching git simply fast-forwards the master branch to the most recent commit in newbranch.
Non-fast-forward merge
A non-fast-forward merge occurs when attempting to merge two branches who have conflicting histories. That is, there have been commits in both branches since the branch point. In this case, a standard git merge will attempt to merge the most recent commits of either branch, resulting in either 1) a successful merge as no conflicts were present across the files in the commits, or 2) modification of the source to indicate where unavoidable conflicts are located. More details about how to fully resolve these can be found in the pull-merge-push sequence.
Rebasing
Rebasing is another way of integrating changes from one branch into another. A standard git merge is nice in that it is a non-destructive operation where existing branches are not modified. However, merging this way creates an additional commit that includes the merged code from each branch. This can quickly pollute the repo history and make it difficult to understand and explore. For example, suppose you are working locally on a feature branch, while master is very active upstream. This might look as follows:

Merging master updates into your feature branch so often creates an additional commit each time, and can get messy quickly.

This is where rebase steps in. Rebase rewrites history to make the history between the two branches linear; it moves a branch so that it begins on the tip of the other branch. In the example, if we were to rebase feature onto master (git rebase feature master), it might look as follows:

This obviously results in a much cleaner project history, requiring no additional commits like git merge. You can also prompt an interactive rebase session (git rebase -i <branch>) allows you change the commit history to whatever you want. Rebase works by locating the common ancestor of the branch you’re on and the branch you want to merge with, storing the diffs introduced by each commit of the branch you’re on, resetting your current branch to the one you’re rebasing onto, and finally applying each stored diff in sequence as new commits to the end of the branch. Note that should there be merge conflict as the diffs are applied, git will inform you and ask you to fix them before moving to next diff. After saving your conflict fix, execute git rebase --continue to tell git to continue onto the next diff.
The primary drawback to the rebase method is that it must be used carefully and in the right contexts; otherwise it can majorly screw up a public branch. The golden rule of rebasing is to never rebase a public branch (onto another branch).
- Merge a branch into currently checked out branch:
git merge <branch> - Merge
branch2intobranch1:git merge <branch1> <branch2> - Rebase currently checked out branch onto specified branch:
git rebase <branch> - Rebase
branch2ontobranch1branch:git rebase <branch1> <branch2>
Submodules
Submodules are git repos inside of other git repos. They act as their own work area, such that when you make changes, commits, etc inside that directory it is like you are interacting only with that repository. Committing the parent directory will bring the containing repository up to date with the latest commits from each of its submodules. Otherwise updates will be made to the repos inside of the submodules, while the parent repo will (officially until committed) still reference the code seen at a particular commit of the submodules.
- Initialization:
git submodule add [https://github.com/](https://github.com/)<user>/<repo>, inside of parent repo - Pull all submodules:
git pull --recurse-submodules - Cloning with all submodules (they are not fully populated by default):
git submodule update --init --recursive- May want to consider
git submodule update --remote --rebaseto prevent detached head on update, which is default behavior as submodules are tracked by particular commits (and hence may represent a repository at some commit in the past, implying the use of a detached HEAD)
- May want to consider
- Pushing all submodule commits (to respective remotes):
git submodule foreach git push origin master(suggested commands with recursive options don’t seem to work)
Tips
Resolving commits to detached HEAD
Every once in a while I find myself accidentally committing to a detached head that I previously used to check out older commits. Switched away from this temporary state can cause that new commit to be lost. Here’s how to resolve this scenario:
- Create a temporary branch right where you are:
git branch temp-branch. This will copy all the committed changed over into a new branch. - Switch to back to
masteror whatever branch you intended to commit the changes to in the first place:git checkout master - Merge the temp branch into the
masterbranch (or other branch):git merge temp-branch
You master branch should now be updated with the new changes.
Squashing commits
Occasionally it can be useful to squash multiple commits together into a single commit (specifically when I’ve made multiple minor but highly related commits). This can be done easily if you the set of commits you want to squash together are consecutive and are the most recent commits on the repo.
git reset --soft HEAD~<X> # where X is the number of commits to squash
git commit -m "New combined commit message"
If none of these commits have already been pushed to the remote repo, you can push easily like usual with git push. But if a subset of the commits are already in the remote repo, you need to use + to indicate the remote branch should accept your rewritten commit history: git push origin +<branch_name>. Check here for additional details.