Web development
CORS and Headers with Flask across subdomains
In the context of self-hosted servers and CORS, things are annoying. To serve an API across subdomains, you can’t just have a Flask WSGI server up and running. You must include a ‘Access-Control-Allow-Origin’ header on your Flask responses for your JS code to be able to use the response (thanks to the same-origin policy). Then, in your JS fetch body, you must have your credentials set to ‘include’ in order to send information like cookies across domains. But then you can’t have your ‘Access-Control-Allow-Origin’ header set to ’*‘; you must specify particular domains you wan’t to allow access. Then you must have a ’Access-Control-Allow-Credentials’ set to true. And only then can you finally maintain a cookie across subdomains.
Static vs Dynamic Sites
- Static sites: sites that serve the same content regardless of who’s visiting the page. The simplest example of this is a group of HTML files served directly by Apache to the client. One can also use a static site generator to create a static site. This is essentially a light framework that can make use of templating and generate (deterministic) HTML pages using content in other files (i.e. markdown). Quick note on static site generators: static site generators are frameworks that take a collection of source files and generate a complete web representation that is to be served up directly by a web server. Once the static site generator creates these HTML, CSS, etc files from your sources, it’s done. All requests to that site now go directly to the completely static files that were generated. Note that these generators can still make use of databases, templating, etc, it’s just that all of the is done once when the site is “generated”, and from that point forward all the content is unchanging. A dynamic site instead builds an entire HTML document every single time a request is made; even my current “static Flask” site is dynamic under this definition. You can, of course, update the content on a static site; it’s just a matter of locally rebuilding the web content from your updated sources so the server is showing the new, still static, content.
- Dynamic sites: sites that serve content conditionally based on the user, device, location, time, etc when accessing the site. Typically there is templating to generate page layouts, but dynamic data from a database (again, conditional on some factor mentioned previously) is used to fill in the page’s content. Although a static site can have its content stored in a database, the main difference here is that the same content will be pulled when visiting the same URL, whereas on a dynamic site the same URL will be rendered with conditional data. A common example of this is a social media site like Facebook. Every interaction you make with the website is recorded in some way (scrolling through feed, clicking on posts, leaving likes, etc) and stored on their systems. The next time you view the site, this information can be used to update what you see, like the posts in your feed. The dynamic aspect of the site here is the ability to record user interaction with the site in a database, and serve content based on a particular user or other factor (not necessarily how the content is decided, that is a system design question that doesn’t make the site any more dynamic). Another example is something like Amazon, who might show you recent, trending deals they have available (content served based conditionally on time), and can render a page with a different price at different times. Note that something like my dashboard is not dynamic; the same exact files are loaded every single time the page is accessed, not conditional at all on the user and the HTML is not built on the fly. It just happens to be the case that the JS loads new content via AJAX by referencing external APIs (I’ve seen sites like this called “AJAX sites”, not falling exactly under static or dynamic). However, my current main website IS a dynamic site; every single time a request is made it (stupidly) regenerates the HTML via templating and sends it back to the client. This should instead be static (and is indeed now fixed).
Server Side vs Client Side Processing
- Frameworks like React and Angular are examples of client side rendering libraries. These libraries use templating on the client side and can react to changing data quickly, reloading the dynamic aspects of the template when the change occurs. An example of this would be a to-do list app, where there is a React template that dynamically renders a
<ul>based on the available to-do items. When a user deletes an item, this HTML list will update immediately on the client side as that part of the template is re-rendered (in Javascript) according to the new data. A request could also be made to an external server to update this change in a database. - How does this look without the Javascript framework? Using a backend like Flask, one can write HTML templates (using Jinja) that are populated by data, then sent to the client for the browser to display. So all “dynamic” functionality is stored inside of the server template. When something like a to-do list item gets deleted in this case, the clicked JS button would perhaps make a call to a Flask route, the function at the route would handle removal of the item from the database, and a “reloaded” template (i.e. the same template as before, now being populated with different data) is sent back to the client. However, this HTML file would have to be reloaded with AJAX for the page not to “reload”, meaning the entire page must be re-rendered to show the single updated data point. Reloading the entire page in this fashion is often not feasible, and thus incorporating the dynamic interaction will typically require some Javascript code and an API. This will allow the client to check for changes recorded on the server side, and use AJAX to make the local changes to client’s page accordingly. The need for this Javascript responsiveness to be built out in a specific way for every site inspired the development of the JS frameworks mentioned above, who instead provide a systematic way to define these interactive components of the page.
MVC Pattern
MVC stands for Model-View-Controller. It is a particular pattern commonly used when developing (web) applications. There are four major components involved with this pattern: routes, models, views, and controllers. From a Flask context, this looks something as follows:
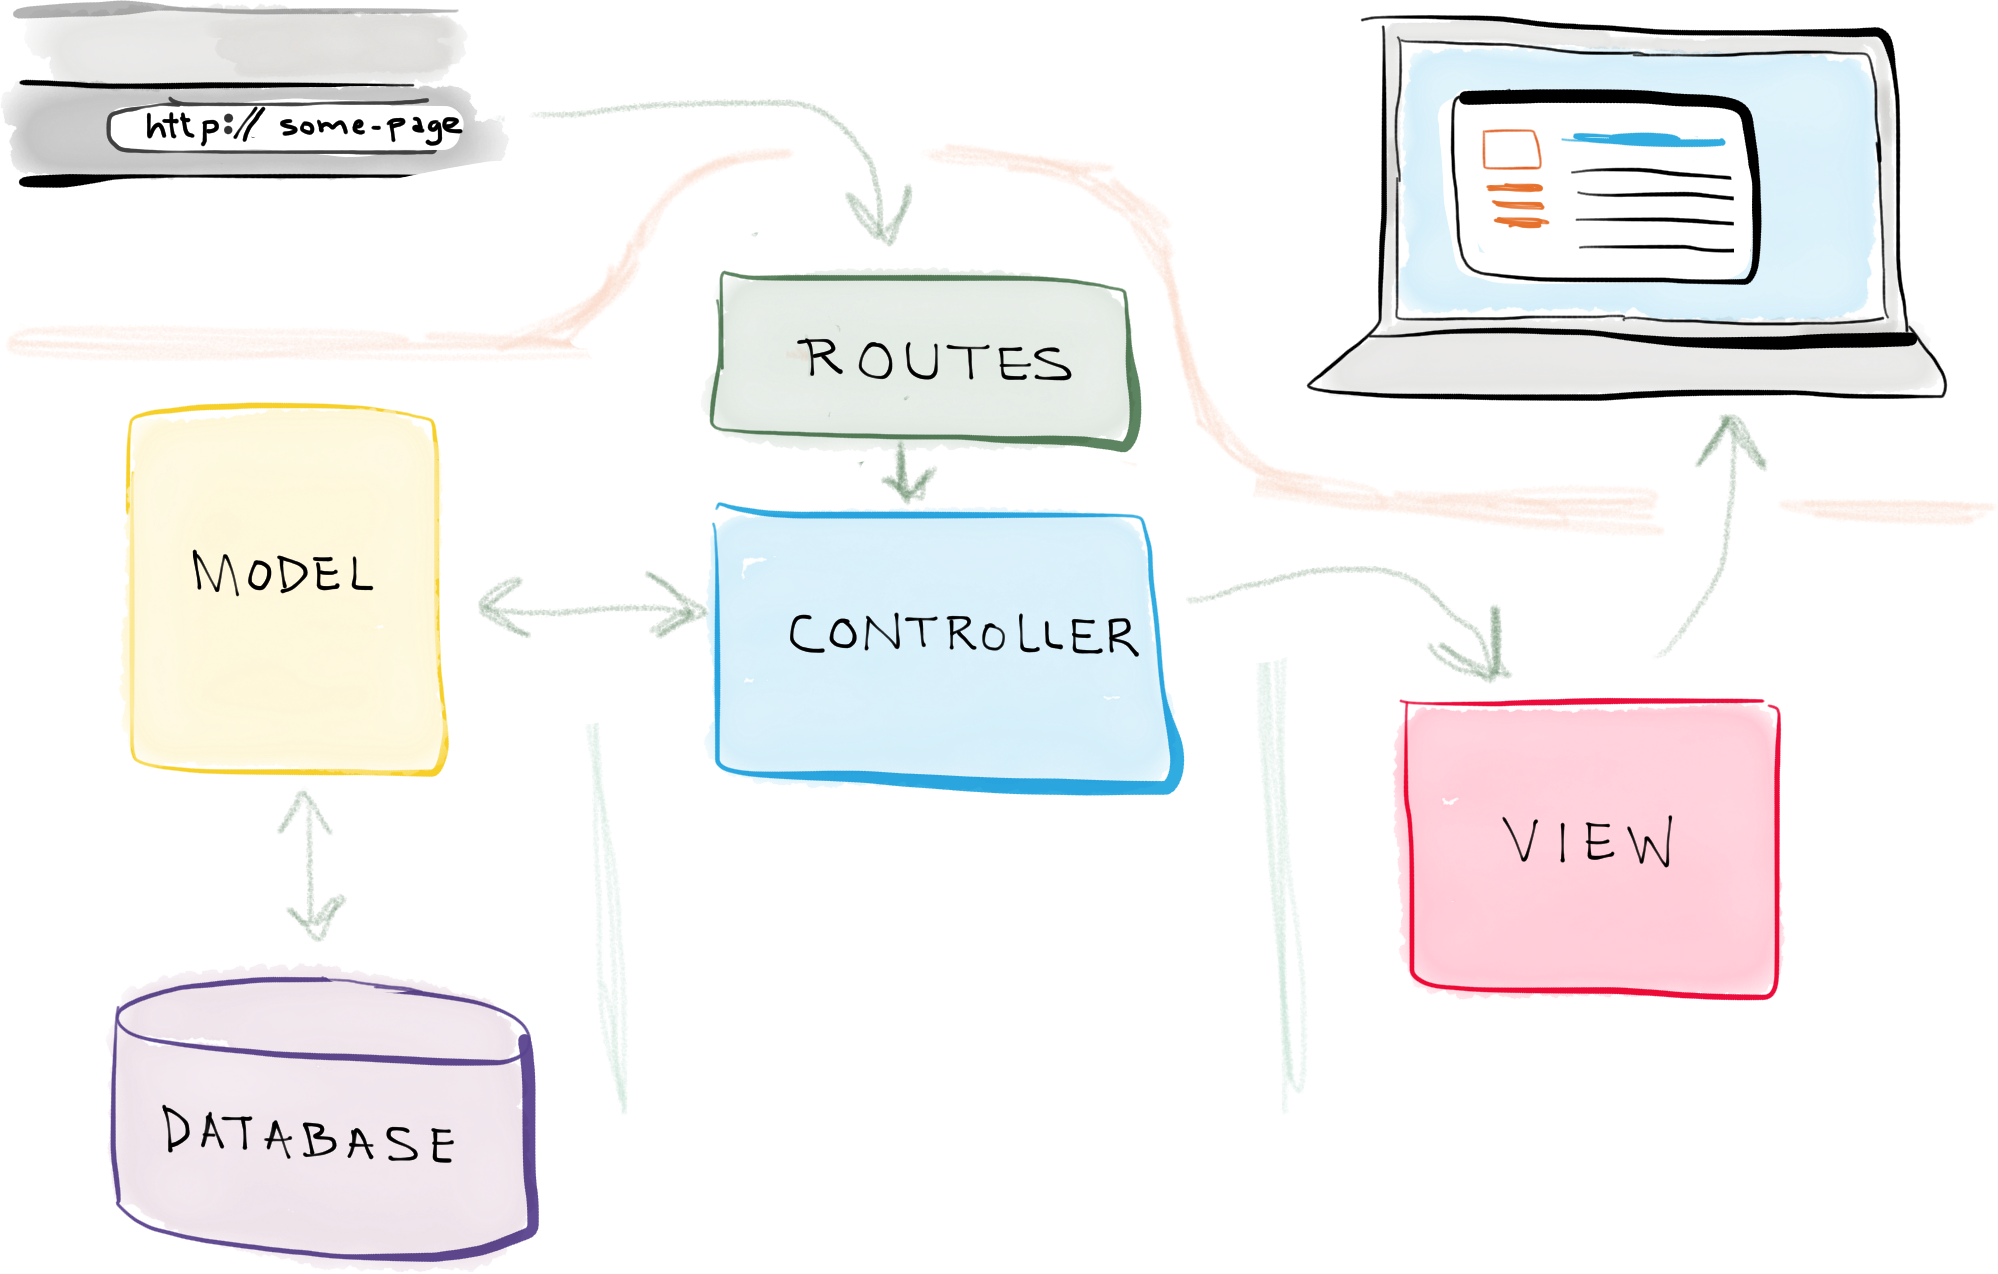
Routes
The basic routing pattern employed by Flask encompasses routes. They are the route decorators atop particular functions in the app; when a user visits a particular URL, Flask looks at the available routes and finds one that matches the requested URL. This prompts running the function associated with that particular route, commonly referred as a controller action.
Controller
The controller is the aggregate of the routing functions, or controller actions, in the Flask app. The controller is responsible for managing inputs and requests (after they’ve been routed appropriately) and turning them into commands for the model. For example, when a user makes a GET request to a Flask API, it is routed to the appropriate controller action (ie a function), and the function interacts with the model to retrieve data from the database.
Model
The model is the underlying structure behind the data being stored. Models are typically implemented in the form of objects that represent data attributes you’d like to store. The model itself is not the database, where the information is actually stored on disk. Rather, the model is essentially an implemented isomorphism to the database schema, allowing the controller to easily interact with the database (ie by formulating queries using the model structure).
View
A view is a visual representation of the information for the app. A view is typically responsible for piecing together a template and retrieved data to render an HTML page that is sent to the client. In a more client-side focused context, the view is less about template rendering and includes more of the Javascript logic behind updating a web page after receiving new information from a controller.
Flask Example
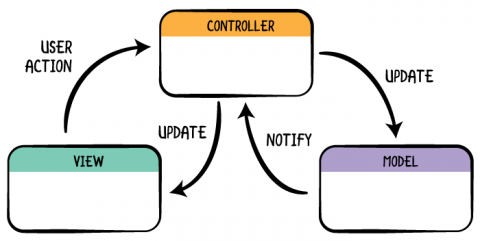
An MVC interaction might look as follows: a user clicks on a button on the web page, which is the current view. This button makes a call to the Flask API, and the URL is used to route the call to a particular function. This function is part of the controller, and will now execute in response to the particular user action that took place. The controller will interact with the model to retrieve some data from the database, without necessarily having to actually construct a query; the model provides an abstracted layer on top of the database, so the controller only has to interact with the objects implemented by the model to retrieve or insert information to the DB. Once the data have been retrieved by the model and are available, the controller will do one of a few things:
- It can send back a JSON response with the requested data. The javascript on the client side is then responsible for updating the web page with the new information. The client side functionality for updating the webpage, as well as the webpage itself, are considered the view. A modern approach to handling this situation involves JS libraries/frameworks like React, Vue, or Angular. These libraries help manage reusable web components and often utilize templating, allow logic to be built in to the page’s response to new data. This enable rich interactions which cannot be handled easily when the entire page has to be reloaded each time, like in #2. Note that you don’t need a JS framework to update your page when new data comes in (current state of monte-carlo app, for example), but it is very wise to do so for larger, more complex apps.
- It can call a template and pass along the data. The templating langauge Jinja is then responsible for using the available data and logic in the template to render a valid HTML document. This HTML document is then sent off to the client to be displayed. The template and rendering process, along with actual rendered client side components once the HTML is recieved (buttons, lists, divs, etc) can be interpreted as the view, making up what the user ultimately sees in their browser. This approach is often best suited for static page rendering, where there is not a lot of user interaction that needs to be built in to the app. When rich user interaction is a must, using this approach for anything other than the initial page load makes things virtually impossible, as the page must be re-rendered on the server, sent to the client, and re-rendered in their browser to display updates.
MTV Pattern
As can be seen with the MVC example, there’s some stretching that needs to be done when trying “fit” a traditional Flask setting into the MTV paradigm. MTV stands for Model, Template, View, more aptly describing common python web frameworks like Django and Flask. It looks something like the following:
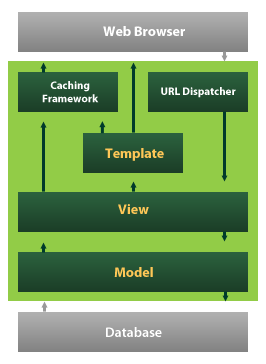
This is a much more familiar looking model under the Flask and Django frameworks. Most of the confusion revolves around how the “controller” really looks in Flask/Django. This is related to the slightly different structure involving templates and views.
Model
The model is an object layer used as a means of interaction with the database. It is essentially a series/hierarchy of classes that represent tables and what attributes they store according to the database. This definition of model is essentially identical to the one used above.
Template
A template is essentially and HTML file that can be dynamically constructed. Typically, one can use a templating language to build in logic to the components of an HTML file, specifying areas to be filled with certain data and allowing that data to influence the page’s structure.
View
A view is a URL’s designated function. After a client visits a particular URL, the URL dispatcher is responsible for making sure the client’s request (and any associated data) reach and call the correct function/view. This view typically implements functionality that involves use of the model to query or make insertions into the database. It will then pass this data over to a template, which gets rendered and the resulting HTML is sent back to the client.
This is roughly the structure that Django and Flask follow. There is not so much a controller as there is a URL dispatcher that makes sure “view functions”
Site Configuration with Nginx (and gunicorn)
(The follow steps are a very vague reminder of how I did it previously. The full tutorial I followed is here)
- Create Python venv:
python3.7 -m venv env - Install
gunicornand any other modules. Here we’ll assume we’re running a Flask app - Create a WSGI entry point for the application point (e.g.
app.wsgi,wsgi.py, etc) - Double check server is loading properly by visiting IP and port after binding gunicorn:
gunicorn --bind 0.0.0.0:<port> <filename>:<executable> - Create systemd service for binding gunicorn to unix socket file, providing a location for Nginx to reverse proxy
- Use basic Nginx reverse proxy (seen in nginx KB page) config to query the app through the gunicorn socket established in the previous step
Loading Bars
Loading bars are simple, right? Have you really tired thinking about how they work? Only recently did I come across this and start thinking a little more critically about how exactly they’re implemented.
Initial Thoughts
Using the context of something like Celery, my thoughts about how this would be implemented are as follows. Imagine a file uploading service and we want to track its “processing progress” with a client side progress bar. You send the file to the server using something along the lines of a POST request I would imagine (I’ve never actually implemented this either). The server receives this file and kicks off some background process with Celery to process the image, returning the client’s request immediately. On this request’s completion, the server actually sends back some sort of ID or URL to visit that will give information about the progress of that particular upload. The client then long poll’s this URL, taking the numbers it receives and updating a local progress bar with them. Once completed, the URL with no longer be valid and the client will stop querying. The process has completed and the progress bar is done with.
Real Implementation Example

Here’s a fantastic diagram from here that shows how this would be done. It matches my initial thoughts pretty closely, making a little more clear that the task on the queue is writing progress to the result backend. We can then read asynchronously from this result backend when we have access to the task id (this is essentially taken care of by Celery). Then, when the client makes a request to some progress endpoint WITH the task ID passed after the processing task is kicked off, they will hit the endpoint making this async request to the result backend to check on progress. This ID being passed back after the first POST request is exactly the behavior I anticipated, and it’s nice to see that’s (at least one way) how it can be implemented. See an example app here, where you can inspect exactly this behavior.